
CJ3 Fusion Line Up and Wait
Pro Line Fusion Citation CJ3 First Flight
A State-of-the-Art Avionics Upgrade
Pro Line Fusion Online Course – Enroll
Spring/Summer 2017 Updated May 2021
© copyright 2017-2021 Personal Wings, Inc.
NOTE: This article is a condensed version of my full-length CJ3 Fusion training documentation. Pro Line Fusion training is available from Personal Wings, click the link to enroll or email Rich Pickett for more information on in-person flight training in Pro Line Fusion.
Update Log:
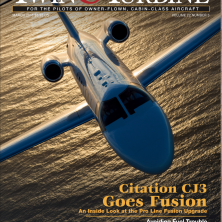
- April 2018 – Read my Twin & Turbine article in the March 2018 issue on flying Fusion in the CJ3! The plane on the cover, and in the article, is the primary one I fly!
-

Twin and Turbine – March 2018 issue – with Rich’s CJ3 Fusion article
- August 7, 2017 – new content and videos on flight planning, navigation, and weather.
- May 2021 – updated to reflect new STCs for the CItation CJ2+ and CJ1+ Fusion installation
Note: Due to the size of the photos, their resolution in the blog is scaled down. To view higher resolution images, most photos link to higher res with a click. This is a very long blog! I tried to keep it short, however Pro Line Fusion is a very capable avionics suite and even at this length, I only barely touch the surface!
I had been looking forward to flying the CJ3 with Rockwell Collins’ new Pro Line Fusion avionics systems since the upgrade program was conceptualized 2 years ago. The CJ3 jets were originally outfitted with the Pro Line 21 avionics suite which is a extremely capable system, but as with all technology, didn’t match the full capabilities of newer aircraft avionics. Cessna has been delivering the CJ3+ with Garmin 3000 avionics since 2015 which offers the latest Garmin technology, but until Fusion was announced there were no advanced system upgrades for the CJ3, other than WAAS and other enhancements to the Pro Line 21. The Garmin 3000 is a great system, offering touch controllers, high resolution displays, and other enhancements over previous Garmin systems such as the G1000, which in itself was a transformative change when released.
Rockwell has been using the Fusion system in other platforms for a short time, and recently had installed them in the venerable Beechcraft King Air, which now offers them as a factory installed system. It was this system that Rockwell elected to customize for the Citation CJ3.
The Pro Line Fusion is unique in many ways, including the incorporation of touch screen technology in the PFD (Primary Flight Display) – a first for the aviation industry. While others have utilized touch controllers (G3000) or touch sensitive navigation displays (Garmin GTN series) this was a bold move by Rockwell to explore this technology.
The upgrade program engineering is extensive, and took over a year for Rockwell Collins and Duncan Aviation to design, install, fine-tune, fly, and obtain FAA approval for this system. A CJ3 owner graciously gave up use of his airplane for a year, so it could be used as a test bed. On Friday April 21, 2017, the FAA granted the approval STC to Rockwell Collins for the CJ3. It was only a few months later than anticipated, however it was worth the wait.
On April 26, Dave Lenz picked up his airplane at Cedar Rapids and made a few flights with Dale McPherson one of the Rockwell test pilots. After they landed it was now up to Dave and I to explore the aircraft. It was great to have the opportunity to teach, and fly, the first CJ3 with Fusion. Our first flight was short – Cedar Rapids IA (CID) to Madison WI (MSN).
It was helpful to have read the 838 pages of the Fusion Operating and Installation Manuals prior to the flight, but trying to remember everything was a challenge and clearly wasn’t possible. Rockwell Collins has a few YouTube videos explaining some of the basic functions which are helpful. While it is clearly a different technology architecture, previous experience with Pro Line 21 provided the basis for many of the FMS (Flight Management System) features, outside of that is is vastly different.
After 200 hours with the Rockwell Pro Line Fusion installation, I’m still learning about all of its capabilities. My intent with this review to offer you a glimpse into this powerful suite, not to cover every aspect of its operation. My goal is to constantly update this blog as I teach, and fly the CJ3 over the next several months.
Pro Line Fusion Online Course – Enroll
The System Architecture
The Fusion system is comprised of 3 Adaptive Flight Displays (AFD). Rockwell Collins also names them Display Units (DU), in case you get confused like I do sometimes. Each AFD (DU) can serve as an MFD (Multi-Function Display) or a Primary Flight Display (PFD), depending upon configuration. This also is useful when an individual display is not functioning, the other displays can show the information from the inoperative display.
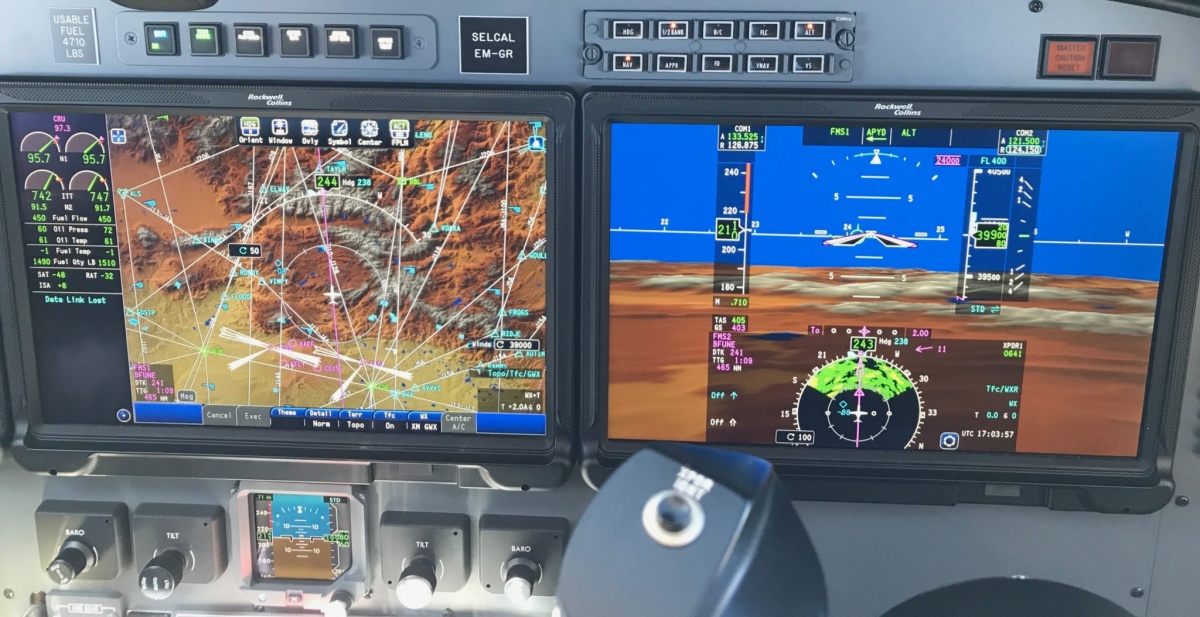
CJ3 Fusion MFD MAP display – Co-Pilot PFD full screen
All of the data is entered on the AFDs, either by utilizing touch on the displays themselves, or through actions using the Cursor Control Panels (CCP) and Multi-Function Keyboard Panel (MKP). These multiple methods of entry are one of the most powerful features of Fusion.
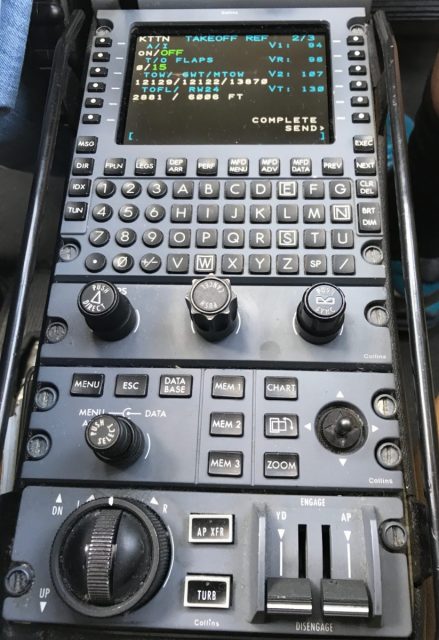
Controls
The CCPs (one for each pilot) and the MKP (which pilots share) are located on the center pedestal. This is the same location that previously housed the FMS display and Keyboard for the Pro Line 21. The location of these controls is a natural reach for both pilots and enables the pilots to use either these controls, the touch screens directly, or both in conjunction for screen navigation and entry. The most optimal method for me is to first touch the AFD field I want, then use the CCP and MKP to do my data entry. As you can see in the photos, the autopilot CRS, ALT, and HDG controls have moved to the top of the pedestal, still in easy reach.
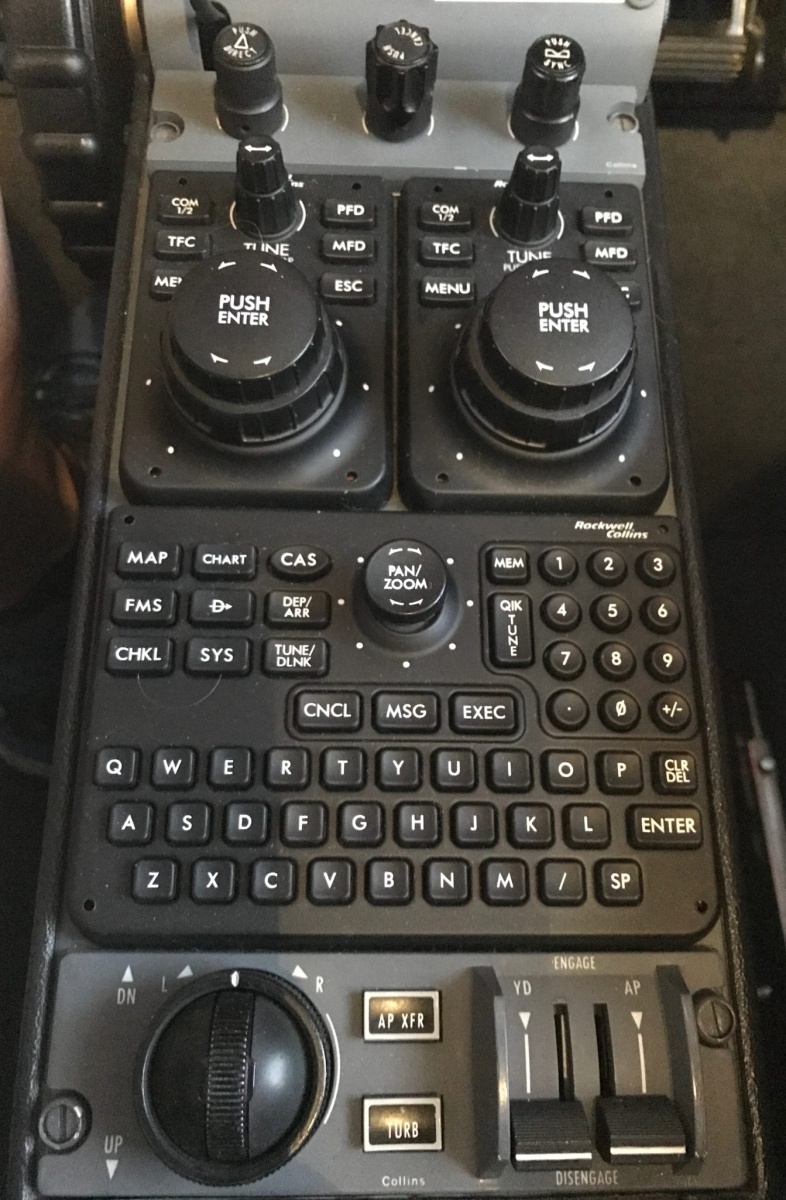
CJ3 Fusion Pedestal Note CRQ HDG ALT Knobs at Top
CJ3 Pro Line 21 Pedestal
Cursor Control Panel (CCP)
The CCPs have several functions that can mimic, or enhance, touch functions on the AFDs. The controller (RC terms this a Multifunction Knob) serves as a joystick for movement on the AFDs, selection of fields for data entry, and select list data – hence the name.
Multifunction Keyboard Panel – MKP
The Multifunction Keyboard Panel (MKP) is extremely powerful. In addition to the keyboard – which is now in QWERTY format, the MKP contains a number of quick access function keys, and joystick. Pro Line 21 pilots will see familiar keys such as CHART, however many are new.
Navigating the Displays
Unique to aviation is the incorporation of certified touch-enabled PFDs that are a key component of the Pro Line Fusion. While some avionics manufacturers may also offer touch screen MFDs, the Fusion system offers some unique capabilities. Since only portions of the PFD are enabled for touch, you may forget which ones. It is simple to find out, just touch the screen on the side and the ‘hot spots’ appear on the PFD to show you the active regions.
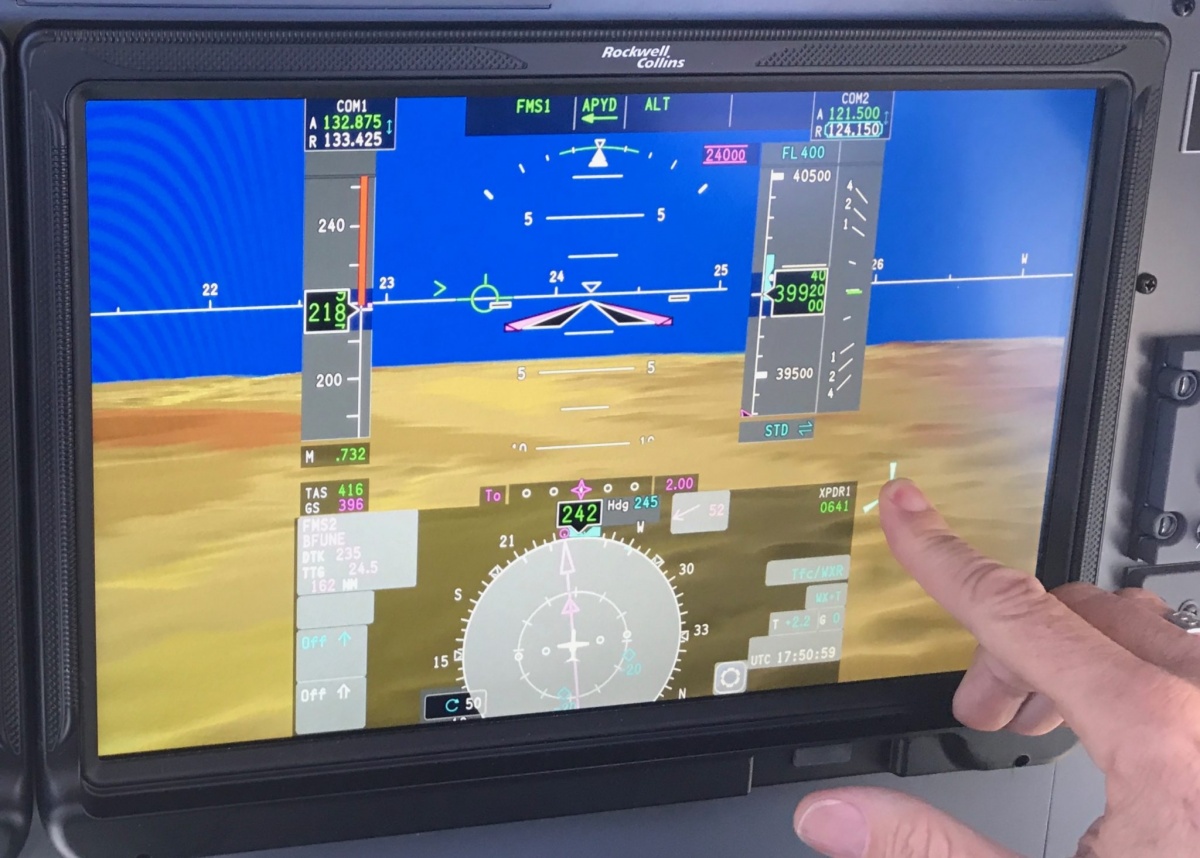
CJ3 Fusion PFD Touch-Active Regions
On to the Flying
Now that I’ve given you a brief introduction to the architecture, it is time to pre-flight the system and fly!
First – Check Status – Initialize System
One of the first steps is to check the status of the system (Databases, GNSS, Position, etc), initialize our weight and fuel, calculate performance parameters, and load a flight plan.
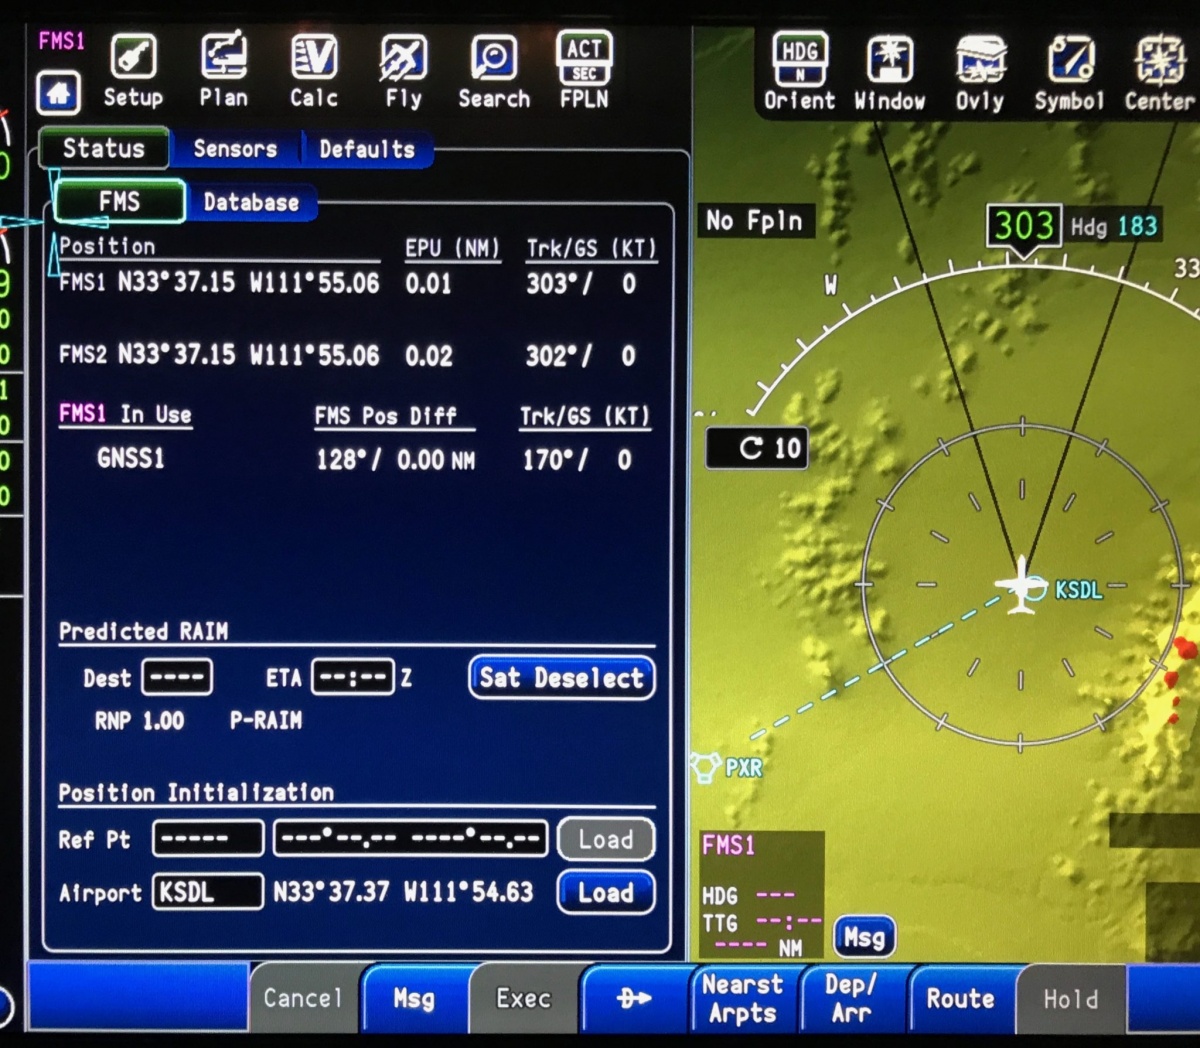
CJ3 Fusion Setup | Status | FMS
Loading The Flight Plan
The Pro Line series excels at flight plan data entry, and the Pro Line Fusion is no exception. As mentioned, you can load flight plans using either Plan or Fly pages – however only Plan will support Airway inclusion directly. Once the Airways are loaded, you can see the full waypoint detail in Fly, and of course modify as needed.
Departure Procedures
Departure and arrival procedures, including approaches, are loaded into the flight plan using the Dep/Arr button The photo below show a curved departure, GROMO 4, on a recent flight from Yakima Washington (KYKM). While initially the departure looks somewhat complex, the Fusion system makes it simple. Since it is an RNAV departure, the Flight Director and Auto Pilot greatly facilities flying it, and it was fun flying the arc.
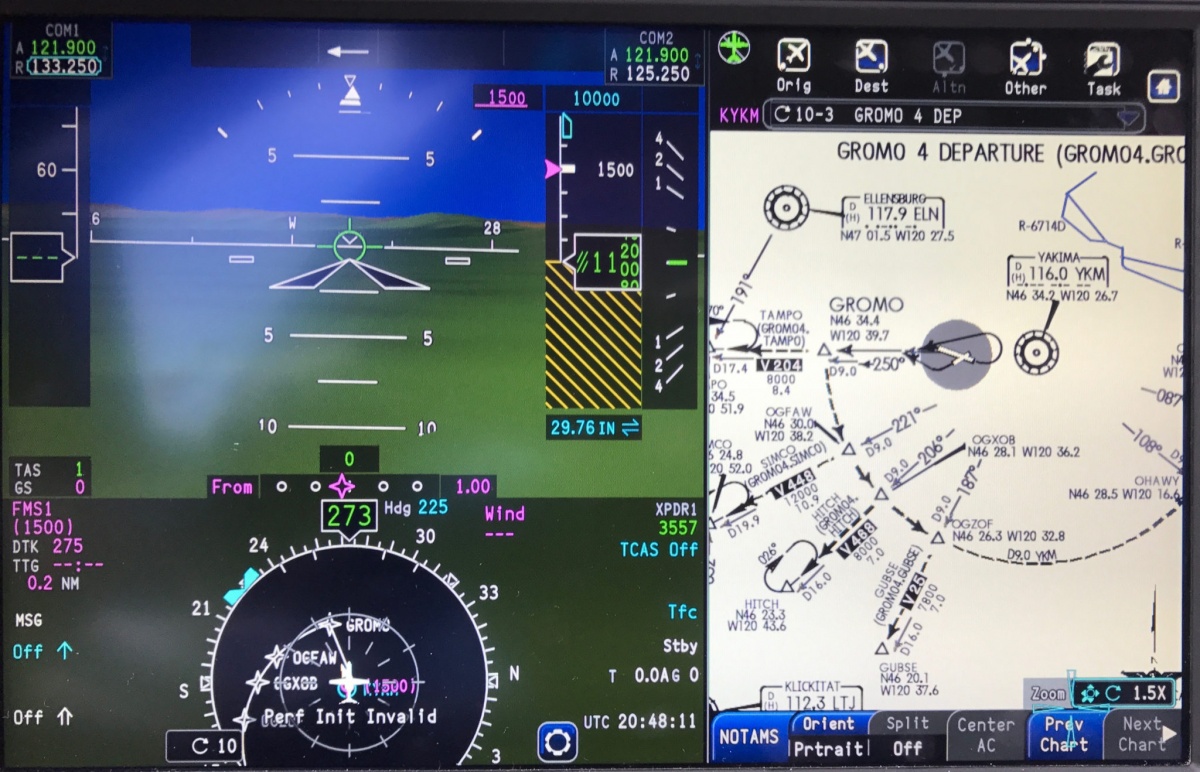
PFD showing the SID Arc at Yakima – KYKM
Cruising
Pro Line Fusion provides what seems an almost unlimited number of display options, offering the pilot a wide variety of flight plan management capability and situational awareness configurations.
One advantage of a long cross county with Pro Line Fusion, is you get a chance to explore all of the display options and features! Sometimes it is even more important to just look outside and appreciate the unique opportunity to pilot such aircraft at 45,000 feet.
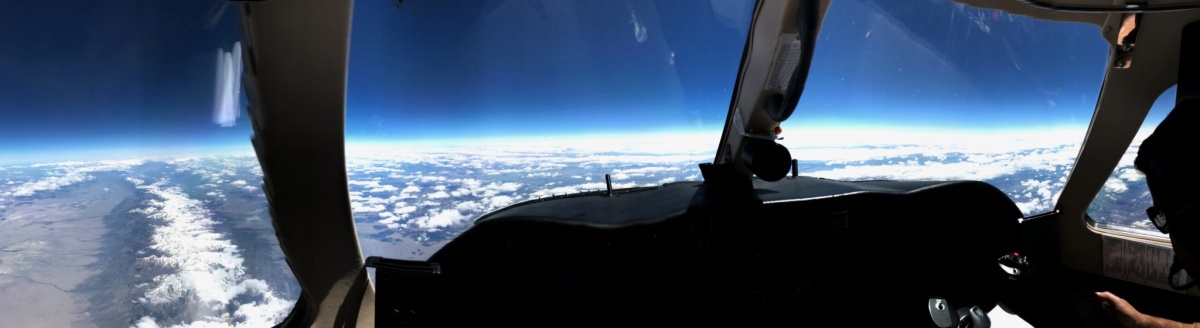
Sometimes it is just nice to look outside – and enjoy the view from Fl450
Crossing Restrictions
Entering Crossing Restrictions (e.g. 10 miles east of JLI at 10000) is easy with Pro Line 21 and Fusion offers even additional methods. Here are some of techniques to enter the data.
- Graphically on the Map. You can touch the waypoint on your map, and the Waypoint menu appears – Select Crossing and the Crossing options shown below.
- Waypoint Icon – Plan or Fly Page. Touch the Waypoint ICON (Note- it is easy to forget and touch the Waypoint name) for the Waypoint menu, Select Crossing and the Crossing options appear in another pop-up dialog/menu.
- Waypoint Field. – Flight Plan or Fly Page. This is the easiest – just to the right of the Waypoint is a field – touch it and you can directly access the Crossing menu.
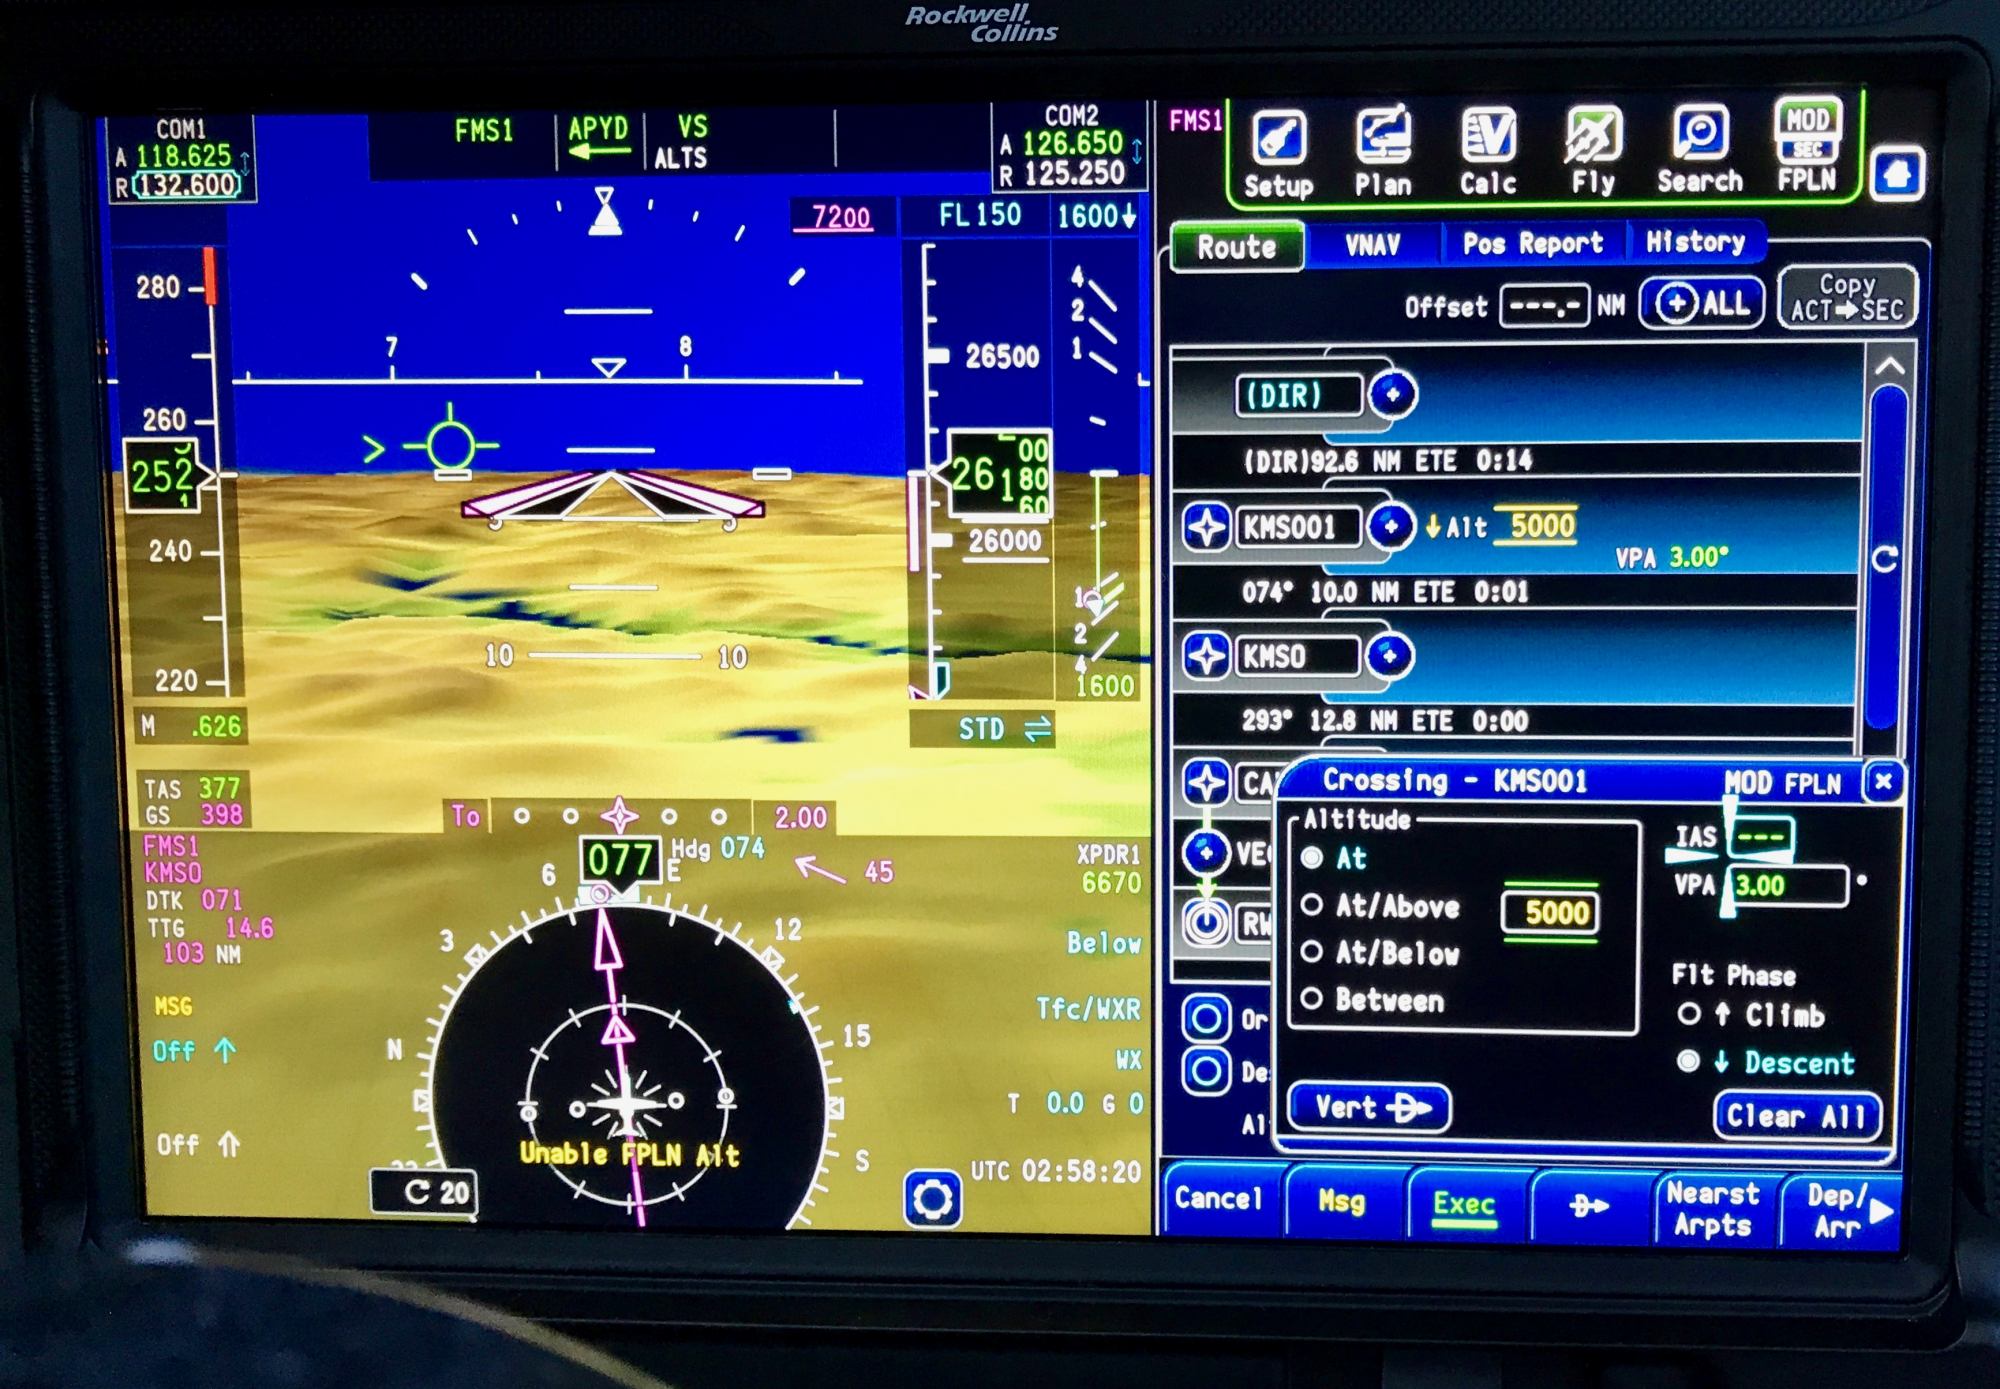
Crossing Restriction before a way point – Second step is to select condition (e.g. AT), altitude (5000), IAS (if applicable). One easy method is simply to touch the empty field to the right of the new waypoint KMSO001 and the Crossing Dialog appears.
Arrival and Approaches
As with so many other features of Pro Line Fusion, there are a large number of methods to select an approach or arrival at an airport. As shown above for the departure, you can select the Dep/Arr button on the Plan or Fly pages.
Perhaps a very unique method is to access arrivals by selecting the ‘feathers’ on the runway approaches depicted on the MFD at the airport icon. As you can see by the MFD photo below, there are ‘feathers’ that depict instrument approaches to runways. Rockwell Collins has displayed the feathers using the orientation of the runways – a great way to spatial orient a pilot to the airport. While we have always been taught to visualize the runways at an airport, this method is far superior to guide the pilot. With Fusion, you can simply touch one of the arrows and the available approaches appear on a pop-up dialog box. I found it very useful when evaluating alternative airports along the route, or when I simply wanted to pick an approach at an airport.
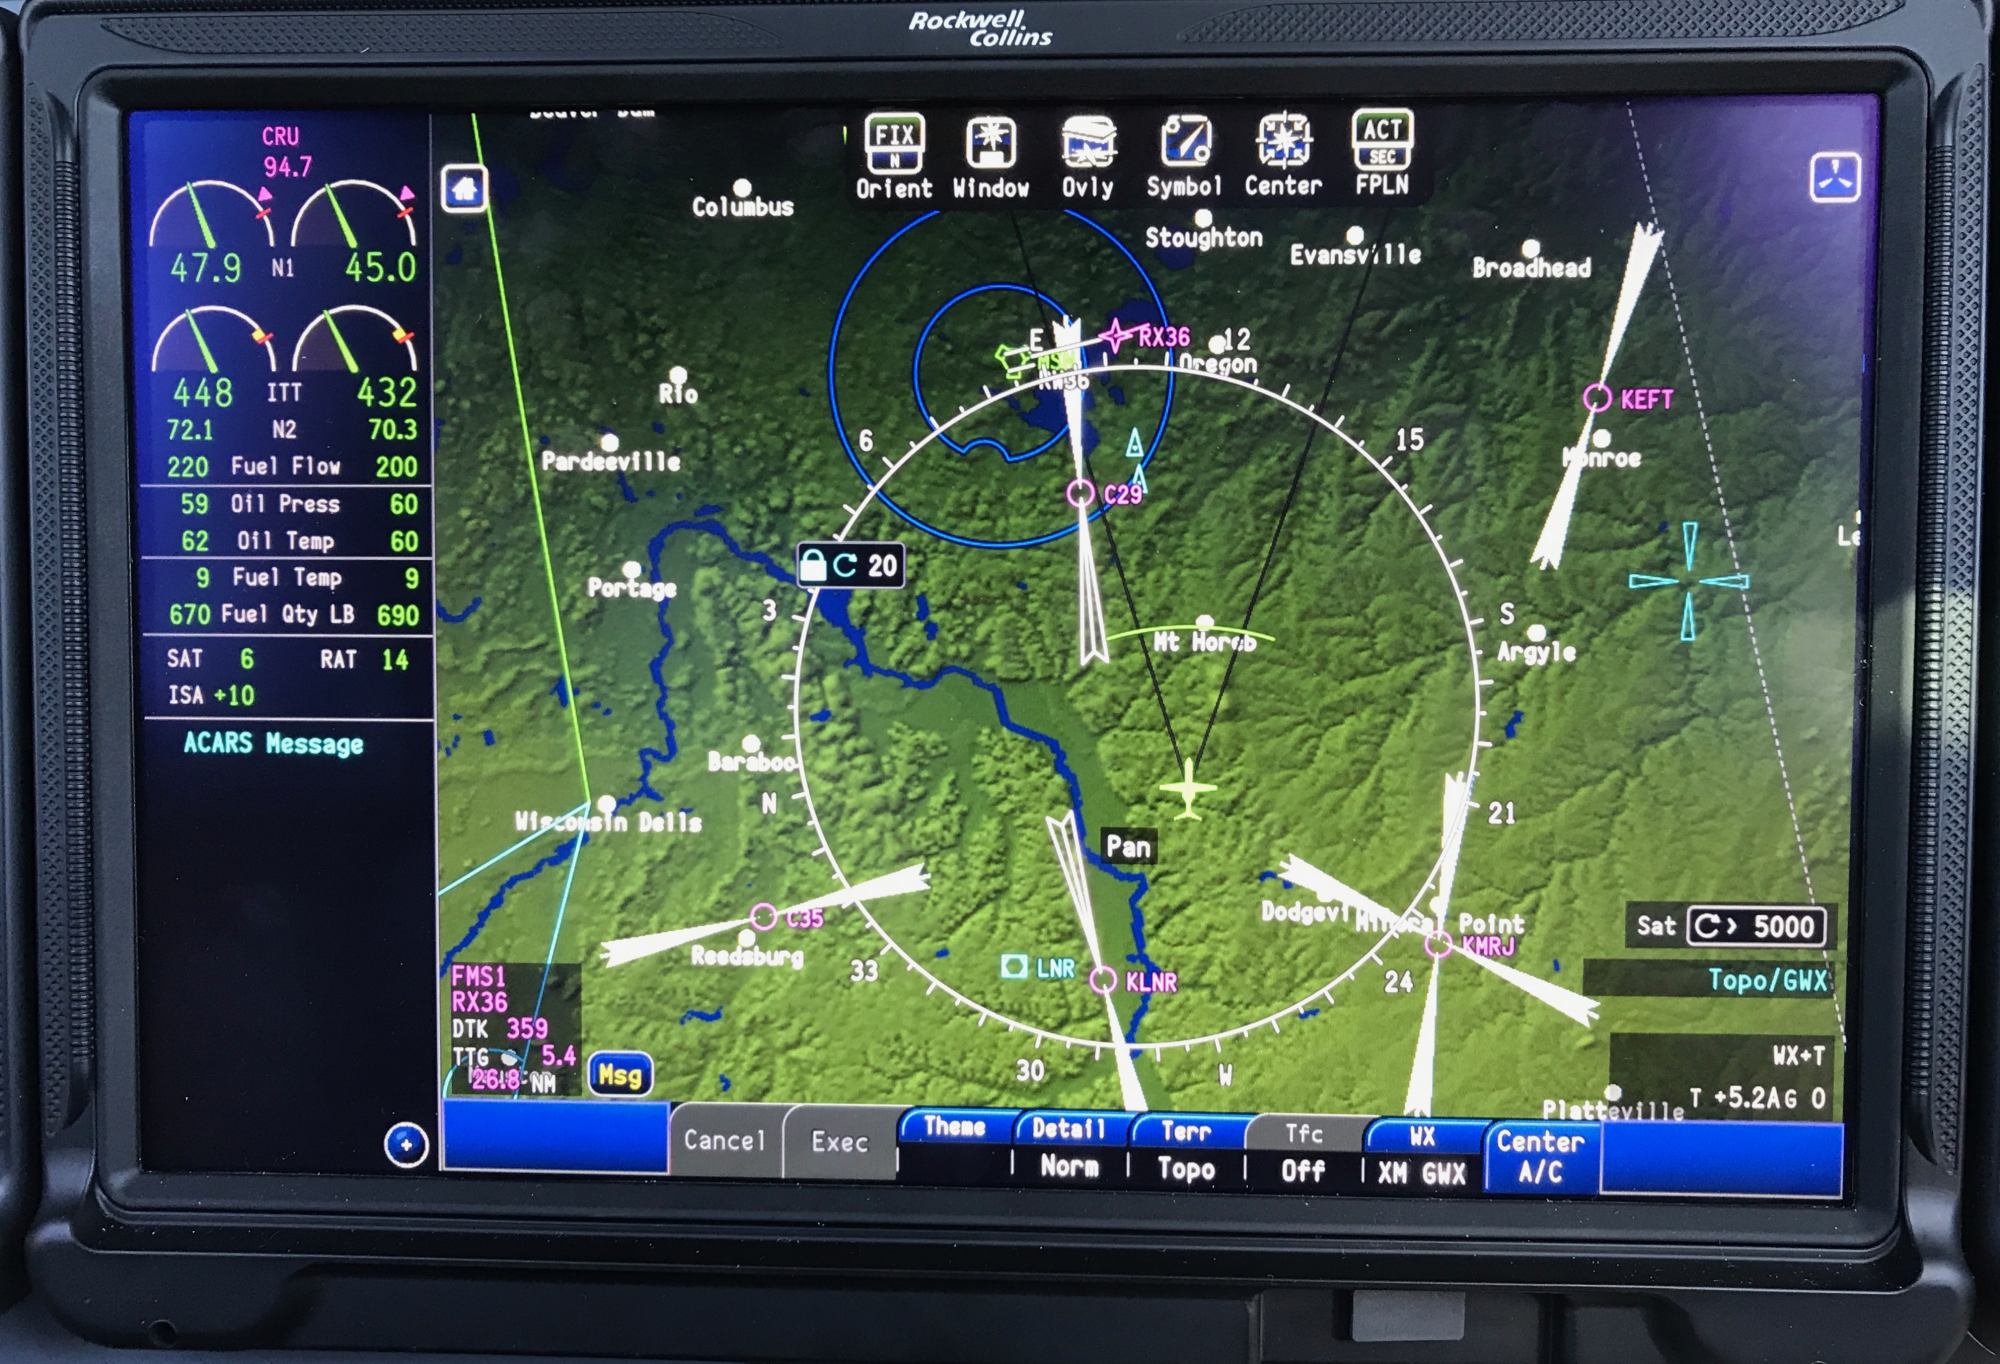
MFD showing the ‘feathers’ that represent airport approaches.
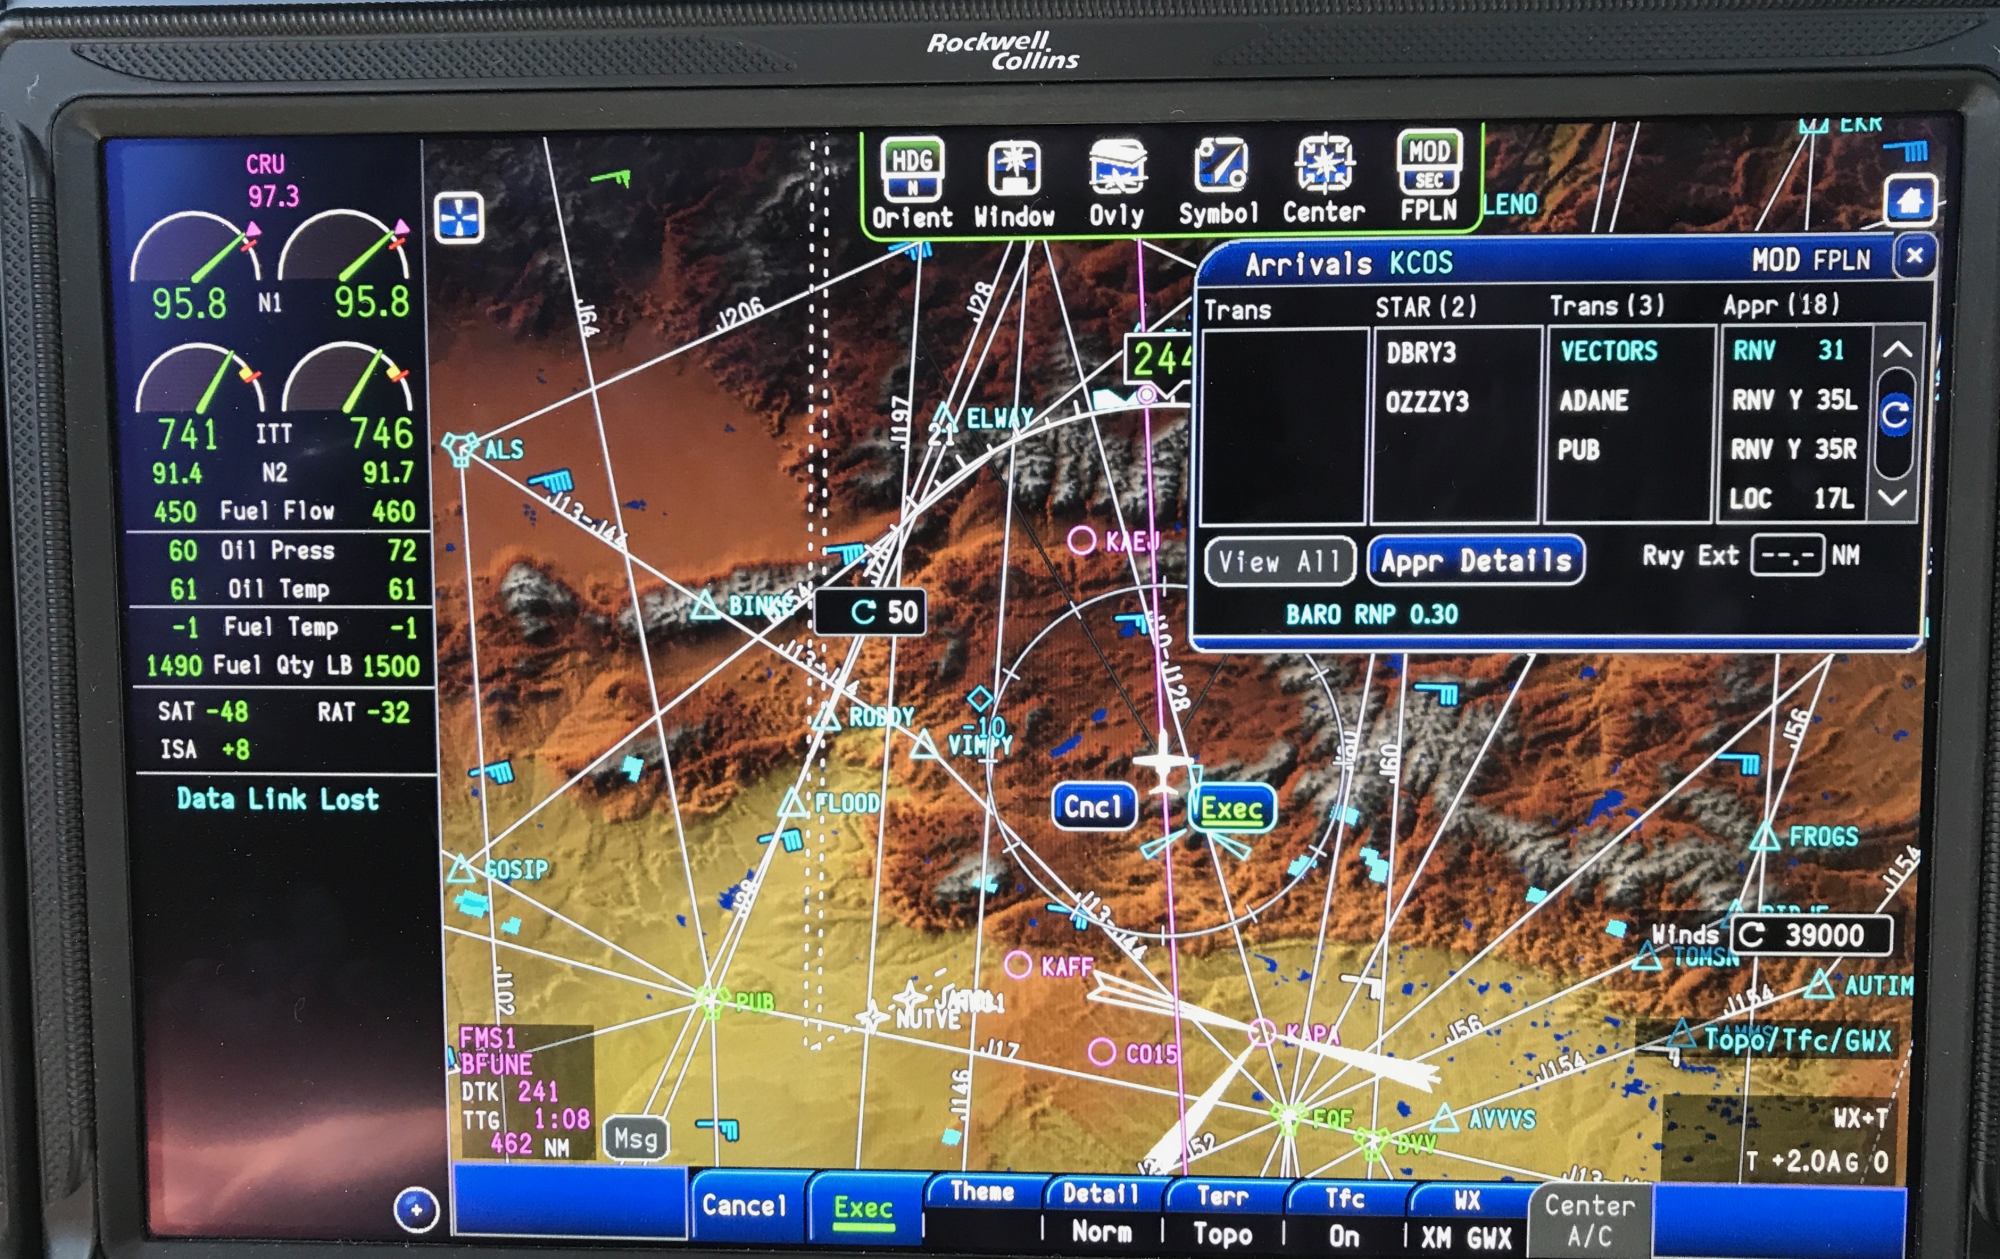
Selecting Arrivals by touching the airport on the MFD – KCOS.
Pro Line Fusion Online Course – Enroll
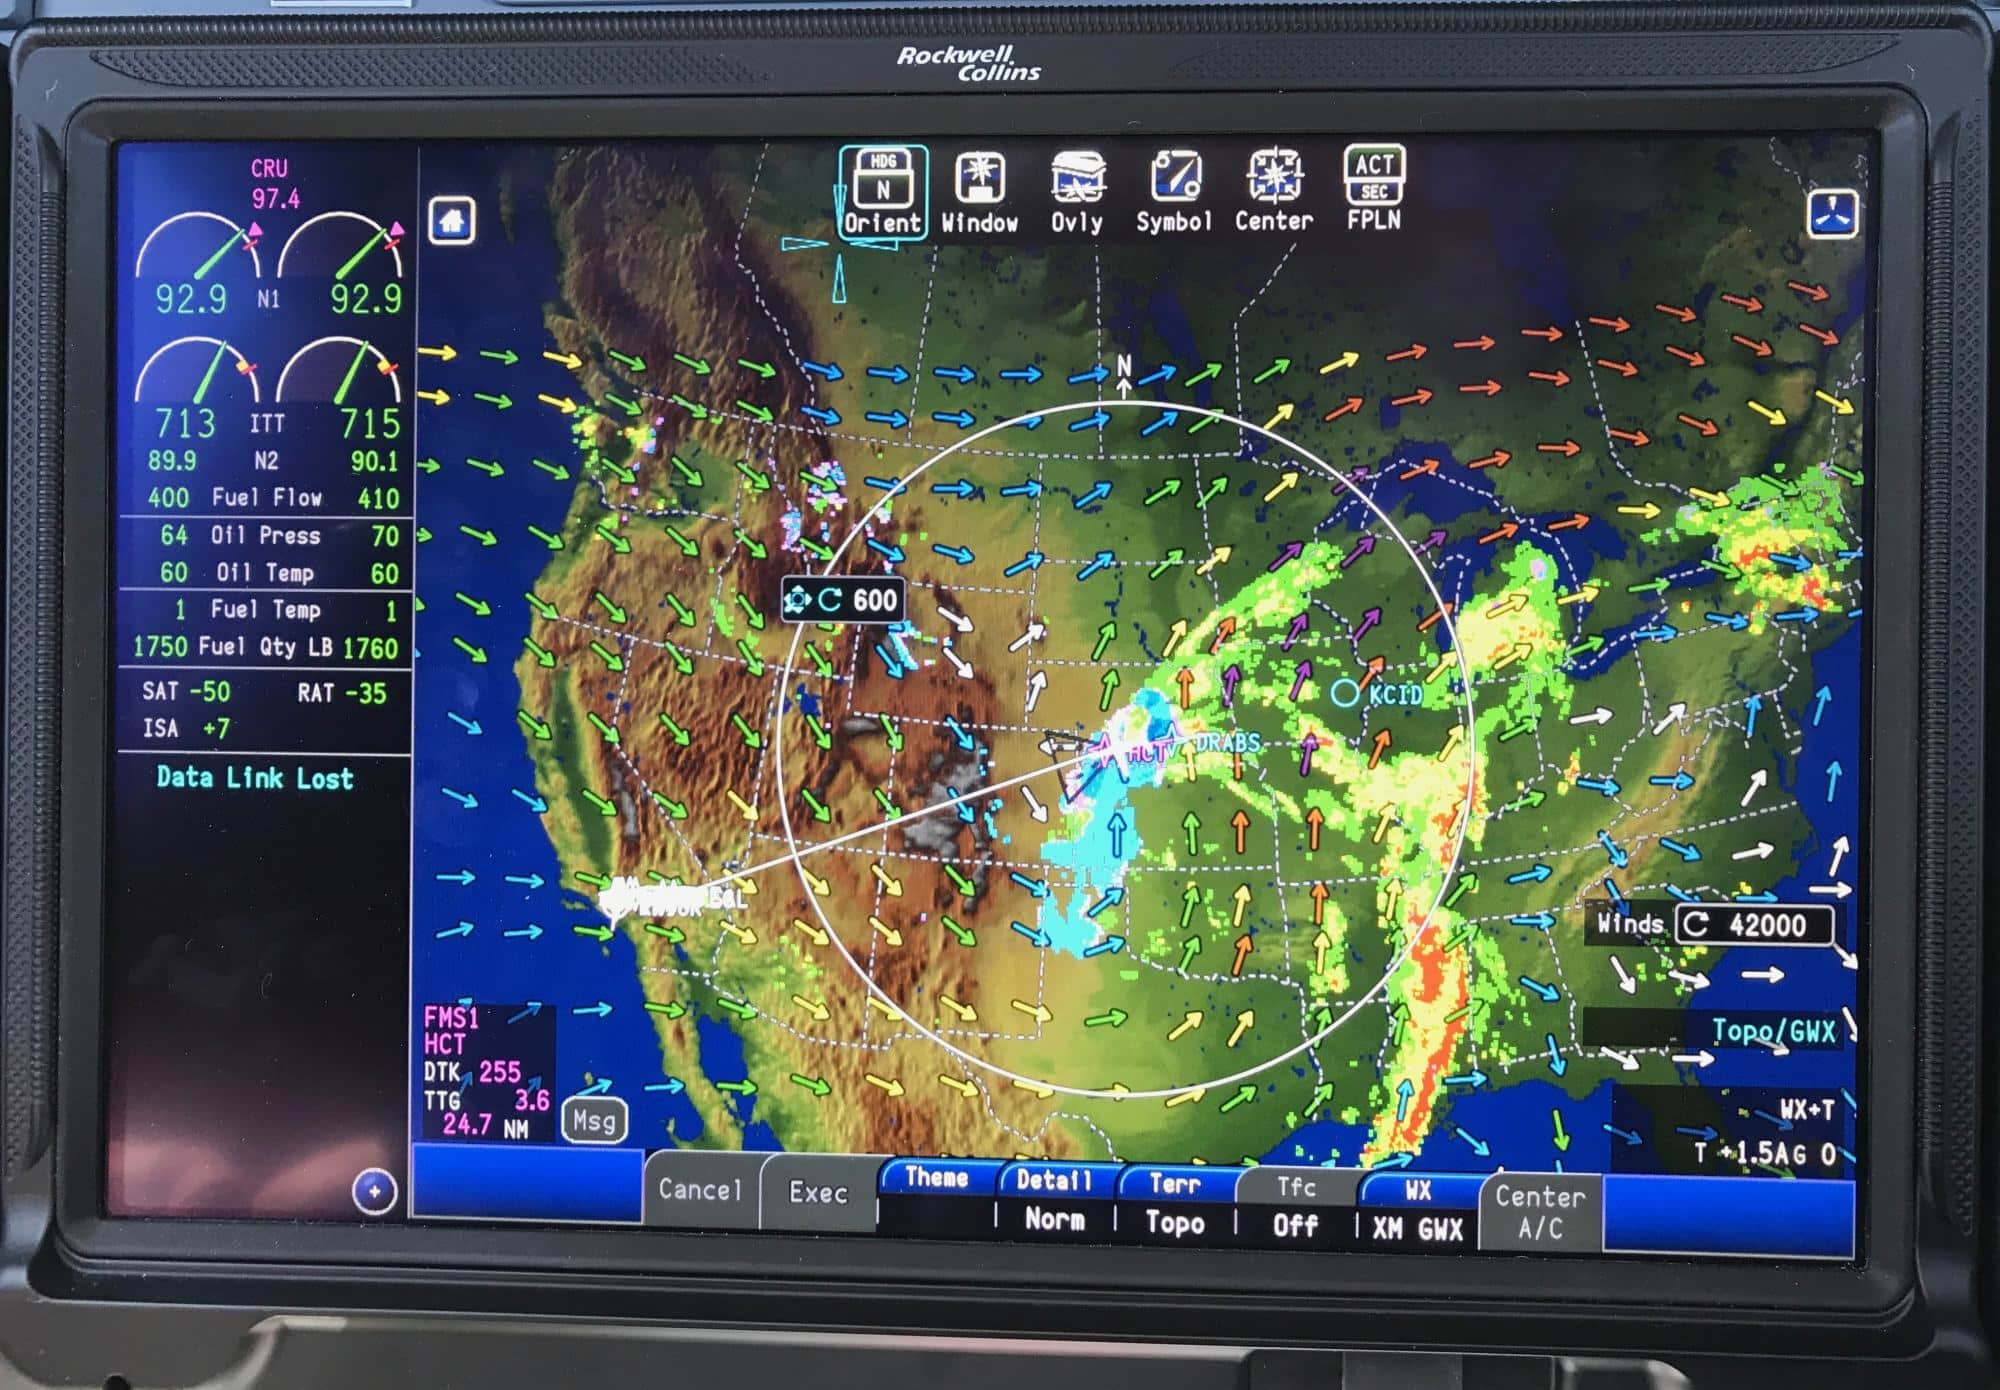
Weather
One of the coolest features of Pro Line Fusion is the outstanding number of weather display options. In addition to onboard Radar, XM/Sirius Weather, you can also add the optional Datalink Request system for weather. I’m only describing the tip of the iceberg, if you can forgive the weather pun! Fusion provides an amazing number of display options, and you can only begin to explore them all over several cross country flights.
Configuring Weather for Display
The pilot can display weather on any one of the AFDs, either as an overlay on the MAP, or a dedicated Weather window to display graphical or text weather. While the Pro Line 21 suite offered a robust list of weather options for display on the MFD, usually be accessing the menu through one of the MEM keys, the Fusion pilot must configure their display. As noted earlier, this would be a great use of one of the Display Memory keys – perhaps User A or User B.
Conclusion
I don’t know if there is a conclusion! After spending a lot of time with Pro Line Fusion, taking 1400 photographs of the system, and a large number of hours writing, I could still spend more time exploring its capabilities. A pilot familiar with Pro Line 21 can learn the system in a few days and operate the system proficiently, however they will only discover its full power over time, similar to some of the more advanced avionics now available to pilots.
Pro Line Fusion is definitely an significant jump in capability over Pro Line 21. I still enjoy flying the later system, however the Fusion system is definitely worth evaluating this upgrade path. For those CJ3 Pro Line 21 operators anticipating adding WAAS and ADS-B out to their existing aircraft, upgrading to Fusion at an approximate cost of $325,000 which includes those functions is worth evaluating.
For Pro Line Fusion training in the CJ3, CJ2+, or CJ1+ – contact Rich Pickett at rich@PersonalWings.com or consider enrolling in my Pro Line Fusion online training featuring the complete write up of Fusion, training videos, and more.
Hey Rich
I was referred to you by Collins. I am having Fusion installed right now at Duncan Battle Creek. It’s going to be about 2 months before we get the plane back but I would like to get familiar with the unit and get some advanced training going. I’m not a computer geek but I catch on pretty quickly. Maybe by the first week of June or so we can get a plan together to learn more about the system. I’ve had the Proline 21 for 13+ years and I still learn stuff about that system. I don’t know if anyone can know everything about it.
Hi Bob,
I’m happy to help with your Fusion transition. I’m picking up my 7th CJ3 with Fusion next week, and you will enjoy it. I’ll email you and we can come up with a plan, and also give you additional access to my detailed materials.
Rich
Hi Rich,
I am not familiar with Collins Pro line 21 and this Fusion evolution.
I have a client flying a G1000 TBM 900 who is considering getting a larger aircraft.
We are trying to evaluate the transition in avionics. I was wondering if you would have any comment on this.
Kind regards,
David, thanks for writing. I’d be happy to chat more. Please email me rich@personalwings.com to discuss your client’s progress towards larger aircraft.